MSC Forum
Sponsor News & Reviews
Precision Ice & Snow
Precision Ice and Snow is a UK Based company specializing in in manufacturing a new material and application system for adding wintery effects to any diorama or vignette.
http://www.precisioniceandsnow.com/Precisioniceandsnow/Home.html

Precision Ice & Snow’s “realistic subzero modelling materials” is new to the market, this snow mixture gives an alternative to the many other snow effect products on the market today.
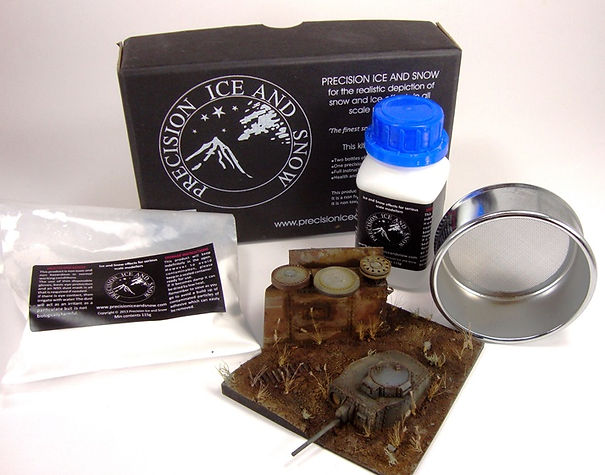
The Ice & Snow mix is an extremely fine white powder mix intended to give a model and/or scene a wintery feel. Precision Ice & Snow offers the product in a complete set, as seen here, containing two bottles of Ice & Snow Powder Mix one 700 micron sieve for dispensing the mix all packaged in a sturdy flip top box. Along with the products in the package they supply a two-page color instructions sheet to get you started.
Having used the product previously I can say that I like the appearance of the finished product and I am pleased with the overall effect given from it use. The application is very simple and there are more applications to use the Ice & Snow with other than laying down a blanket of snow and the price is comparable to many other snow effects on the market.

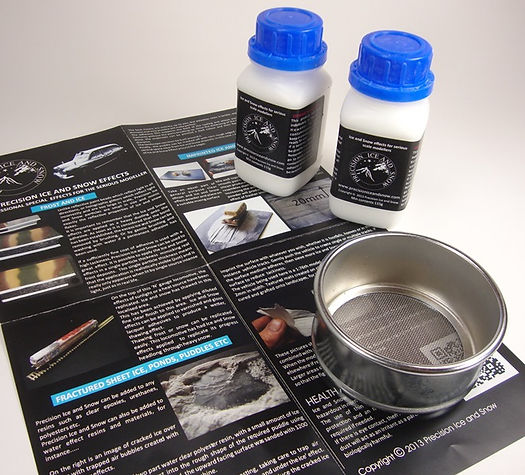
The Precision Ice & Snow Set comes with two bottle of Ic & Snow mix, 700 micro seive and a two-page instruction sheet.
This product is basically the last step to be used on your project, so a finished model, diorama or vignette will be needed. For this review I chose a small Wedgie creation from a local casting source; Celticwerks. I recently finished a nice little review of the 38t Wedgie here on MSC:
The first look I took at the Precision Ice & Snow I attempted a snow-bound scene in 1/72 scale using a Pz.Kpfw.IV vignette. I feel the results were excellent in this scale. The Snow and Ice Mix is fine enough to give the semi-granulated appearance of realistic snow, while still allowing a transparency to allow the work below to show through as it would in real life.
 Final Pictures (5).JPG |
|---|
 Final Pictures (9).JPG |
 Final Pictures (12).JPG |
 Final Pictures (1).JPG |
This time out, I wanted to step up the scale a bit and by using the 38t Wedgie, I am now working in 1/35. This is not a large area to cover so simply spraying some adhesive and sprinkling the product will not do. Snow in itself has a random appearance to it as it falls, wisps and is wind driven. With simple application techniques a multitude of effects are obtainable.
There are two recommended adhesive mediums for the application of the Ice & Snow; first is Photo-mount Spray adhesive and Hair Spray. Notwithstanding that I have not had the opportunity to us the Photo Mount Spray, I have used hair spray in both the aerosol can and airbrush applications.
I found there is less control to the adhesive application through using the aerosol can. The appearance is not as smooth but does have its submission. With the airbrush I was able to reduce the airflow allowing be spot on application and I was able to control the product application a bit easier.
Making it snow in 1/35
 a (4).JPG |  a (5).JPG |  a (6).JPG |
|---|---|---|
 a (7).JPG |  a (8).JPG |
For base coat placement and precise spot application, I found that a small brush works well on placing the hair spray exactly where I want. After applying Precision Ice & Snow to the area desired, manipulation of the snow effects can be done with a variety of brushes to create drifting and general buildup of the snow.
A light misting of hair spray over the area you wish the snow to collect and while still tacky…not wet, take the sieve and snow mix and lightly tapping the side of the sieve will cause the snow to fall onto your model. Do not worry if there is too much as excess can be swept off with a brush. You can also use the airbrush and light quick blasts of air will remove or educe the amount of snow on the piece.
 a (3).JPG |  a (9).JPG |
|---|---|
 a (11).JPG |  a (12).JPG |
 a (13).JPG |
Making snow with a driving effect is easy to do as well. While applying the adhesive medium of choice, make sure the adhesive is in line with the direction that you want to depict the snow is driving. Spay the adhesive in this direction. The, while the piece is tilted in the same degree of pitch, use the sieve to apply the snow building up as desired. The adhesive allows the snow mix to stick on one side of the object only. This is where the feeling of directionality comes into effect.

Most of the work involved with Ice and Snow is in the application. Where and how you want the snow to look is what it is about. As seen here in a Pz. IV diorama I recently finished using Precision Ice & Snow, I was actually looking for a bit more ground covered snow and a somewhat driving look as if it has started to storm covering existing snow adding new snow where areas were bare.
With the 38t, I was looking for just the ‘Frosty’ approach. The snow is built up in areas but absent in others. Care was taken to get the snow onto the bolt heads and grass tops. By allowing the snow to fall directly down on top of the tank after applying the adhesive the snow naturally collects on to the high points…even from the side. The grass was a touch different. If you hold the piece you are working on at an angle and apply the adhesive from the side I could pinpoint the snow to the tops of the grass a little.
Pretty much that is all it takes. Plat where you want the snow, add the adhesive, choose you form of application and there you go…Snow! Next I want to show a couple of small applications that can be done with Precision Ice & Snow.
 a (19).JPG |  a (21).JPG |
|---|---|
 a (14).JPG |  a (20).JPG |
 a (15).JPG |  a (18).JPG |
 a (17).JPG |  a (16).JPG |
Alternate Applications
Ice & Snow can be used for numerous applications, mixing with various products. I chose three different makeups using two different products for this; epoxy and Silicone (Water Effects). First one here is the epoxy. I simply mixed up the two part epoxy, add some Ice & Snow mix and thoroughly mixed. I used small plastic bags under the mix as the epoxy does not fully adhere itself to the plastic. Once dry, all you need to do is pull the dried epoxy mix off and use. This can be cut to shape or placed whole on top any diorama and then build up the ground or snow effects up around the ice. If you want a shinier look, flip the finished product over. This can be glued down with PVA or silicone. If you take a more ridged epoxy than I used here, you can bend accordingly to achieve a nice cracked ice effect.
The next application I want to show is making a frozen snow mix. By taking silicon or Water Effect as I have done here and mix about 50/50, smooth the mix out onto some plastic and allow drying. Again, the mix will not stick to the plastic, remove and glue into place on a road or pathway for a packed frozen snow look.
Finally I wanted to try a chunky snow plowed effect. I achieve this by mixing the Ice & Snow with some Water Effects. I mixed a 25% Water Effects with about 75% Ice & Snow. By reducing the amount of Wet Effect medium the Ice & Snow clumps and has a slightly drier look to it. After I set the mix into a shape I wanted, I grabbed a trusty can of hairspray and misted the clumped snow. I then used the Precision sieve to dash some fine loose snow on top of the pile. I think this gave the snow clumps a very realistic appearance. Larger snow pile can be made if small pieces of foam or Styrofoam can be cut and placed on the diorama base. Cover with plaster compound, when dry; add a fresh layer of snow either in clumps or with the sieve.
 b (1).JPG |  b (2).JPG |
|---|---|
 b (3).JPG |  b (4).JPG |
 b (5).JPG |  b (6).JPG |
 b (7).JPG |  b (9).JPG |
 b (10).JPG |  b (8).JPG |
 b (11).JPG |  b (12).JPG |
 b (13).JPG |  b (14).JPG |
 c (1).JPG |  c (2).JPG |
 c (3).JPG |  c (4).JPG |
 c (5).JPG |  c (6).JPG |

Conclusion
I feel that Precision Ice & Snow is a welcomed addition to the dioramic world. The final results appear to be give a fine scale representation of real snow, not only in 1/72 but in 1/35 as well and more. The product is easy to use as well as forgiving. If you apply too much in an area or in the wrong area, you can take a soft brush or even an airbrush with low pressure to easily remove or manipulate the freshly placed snow. The startup cost of purchasing Precision Ice & Snow is comparable to many products on the market. Precision offers refills of Ice & Snow on their website for a more than reasonable replacement cost. If you are like me, you like to have options while building. Precision Ice & Snow is a great option to add to the bench.
From the Manufacturer:
Health and Safety
Ice and Snow products are non toxic and non hazardous in normal working conditions.
The use of thin disposable gloves, basic eye protection and an N95 dust mask is all that is required if needed.If there is eye contact, then irrigate with water. The dust will act as an irritant as a particulate but is not biologically harmful.
I wish to thank Precision Ice & Snow for supplying MSCF with this review sample.
If you are interested in in Precision Ice & Snow, please check out their website
http://www.precisioniceandsnow.com/Precisioniceandsnow/Home.html